Various ways of using AI VJ are set out below — from projector setup to your own media, Spout output, and keyboard control.
Projector or Secondary Screen
When AI VJ starts it automatically detects if there is a projector or secondary screen available. It then launches a second output window
To make AI VJ detect your projector or secondary screen:
– Make sure it is turned on and recognized by Windows
– And make sure it is turned on *before* you start AI VJ
You can set the output window from full-screen to windowed mode using the little square that appears on mouse-over in the top-right corner
If you have more than 2 screens and prefer it to be on another than the one it picked by default, you can drag the window in windowed mode to another display, and set it to full-screen again there
If you only have one screen, you can still hide the UI by clicking the full screen icon on the side panel (or any empty spot there) and fully enjoy the visuals!
Offline Use
Normally AI VJ is started through Steam. This helps you get the latest updates, fixes, and news
But on the road, internet access is not a given. To make sure your show can go on regardless of connectivity:
– In the AI-VJ Main menu, *create a desktop shortcut for offline use* and click it (or find the executable, usually at C:\Program Files (x86)\Steam\steamapps\common\AI-VJ\AI-VJ.exe)
– Then if you have no internet connection, you can use AI-VJ offline
– If you are connected to the internet, AI-VJ will close and first try via Steam. But if Steam asks for a login, but you haven't got your password, or such, just close the Steam login page and click the shortcut / executable again, and AI-VJ will now start in offline mode
– Note that you can run AI-VJ in offline mode for 50 hours (only counts actual runtime, not time passed) before you need to reconnect with Steam and run it that way, to reset the 50 hours
Using your own VJ Videos / Loops
You can import videos onto a Bank by clicking the little folder icon: The last icon on the Banks icon row (left side of the screen)
– Thumbnails will then be generated for your videos; Some patience required
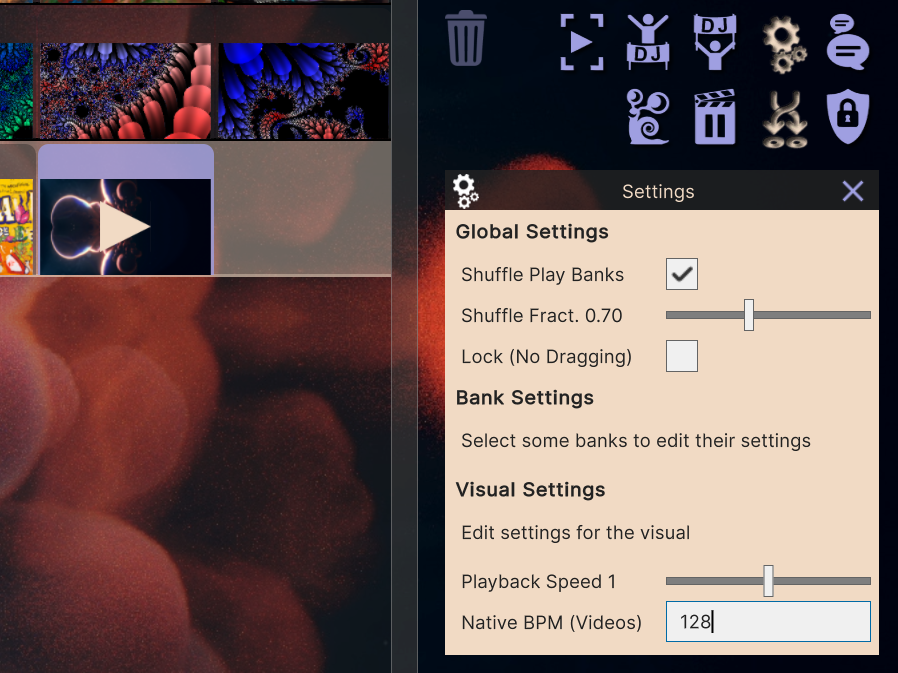
If the video has a BPM specified, be sure to set the VJ video's native Beats Per Minute (BPM) in the settings side panel
– Open settings in the right side panel by clicking the gears icon
– Then select the video(s) for which you wish to adjust the BPM and set it, say to 128
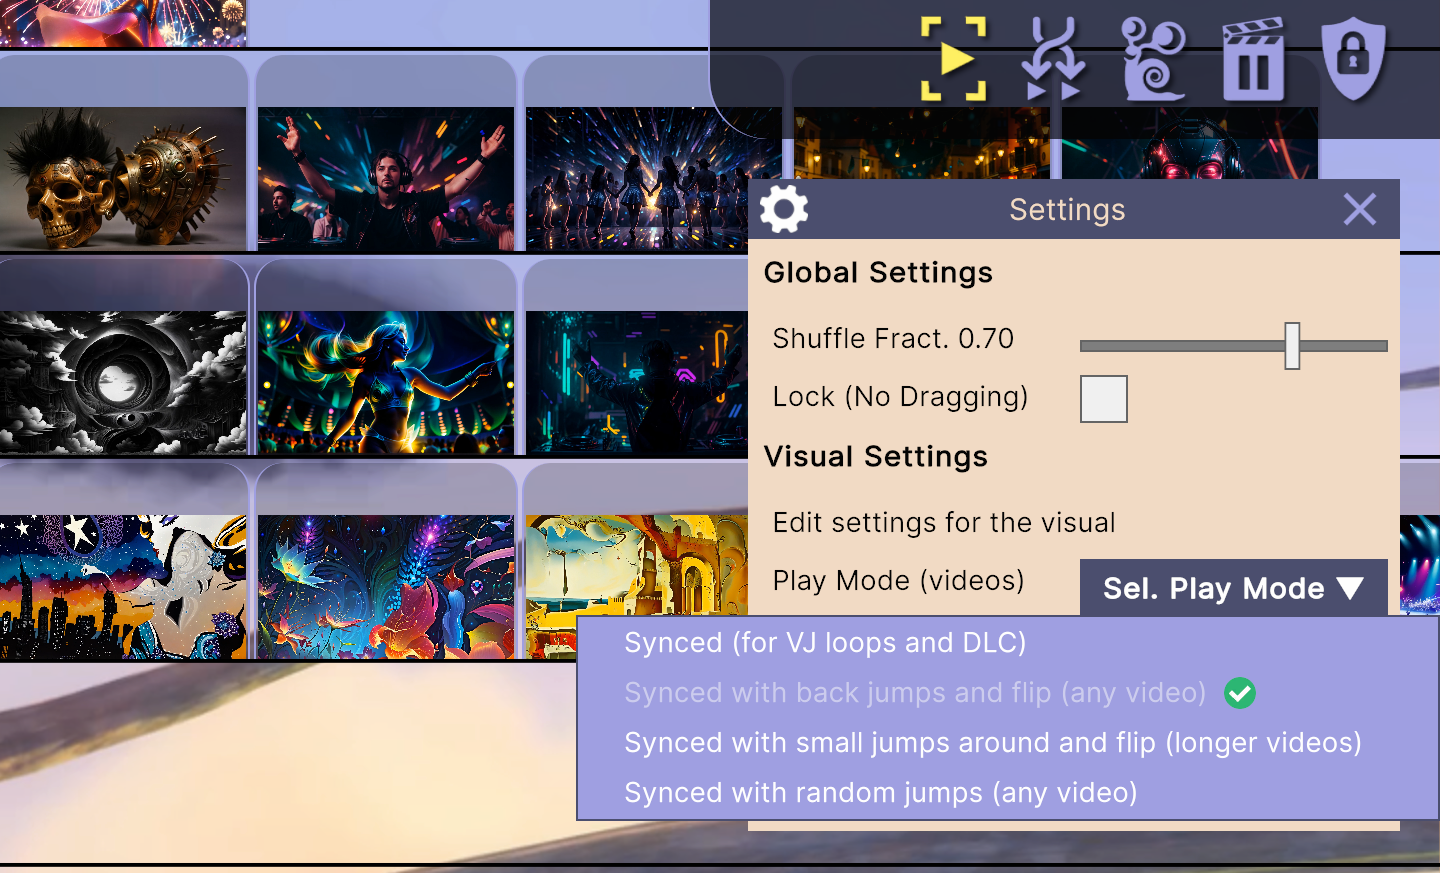
Also select the Synced Play Mode
– Open settings in the right side panel by clicking the gears icon
– Then select the video(s) for which you wish to adjust the Play Mode and set it to Synced
– For normal (not specifically VJ loops / VJ) videos, the other 3 Play modes may be more appropriate
Especially VJ Loop type videos often have a BPM specified. Ours are all 120 BPM. I've seen anything from 80 to 160
If there is no BPM specified, leave it at 120 BPM, or experiment, also with other Play Modes than Synced
In Synced Play Mode AI VJ will then automatically adjust the playback speed of the video so it always matches the music at any BPM
It will look best when the video was recorded at 60 frames per second, as opposed to the usual 30. Ours all are at 60fps
Virtually all video codecs are supported. Too many to list. I recommend you simply try the video format you want to play, and see if it works. 95% of them should!
For many video formats performance can vary a lot depending on your machine. Especially for play modes involving seeking
We prefer mp4 with the H264 codec and 'yuv420p' pixel format, as hardware decoder support is widely available for it!
If you experience black flickers / interruptions between videos, try storing them (and AI-VJ) on an SSD or NVMe — a slow hard disk causes this
Using your own Images
You can import images onto a Bank by clicking the little folder icon: The last icon on the Banks icon row (left side of the screen)
The images will automatically be resized to fit the screen without cropping (cutting parts off of them). So especially portrait sized images will have black areas to the side
One picture will be shown on every beat. To half the speed of the slide show, click the little snail icon on the right panel
The following file formats are supported: .png, .jpg, .jpeg, .gif, .bmp, .tif, .tga, .psd. We prefer .png, but .jpg is fine
Using your own 3D Models
You can import 3D Models onto a Bank by clicking the little folder icon: The last icon on the Banks icon row (left side of the screen)
– Thumbnails will then be generated for your 3D Models; Some patience required
Your models are automatically analysed for width and height, and resized to fit the screen.
If they are rigged with skeletal info:
– And they are humanoid and conform to one of these formats: Mixamo, Blender / Rigify, 3ds Max Biped / Character Studio, VRM / VRoid, Daz, they will automatically dance to the music
– Otherwise, if they come with their own animations, those will be automatically played, switching on every beat
How they dance / move can be changed using the Play Mode setting in the settings panel (the gears icon)
Whether they move on a stage or not, and what kind, can be changed using the Stage Mode setting in the same panel
3D Models are best when added to the FOREground layer of a multilayered deck (dropdown at the top-right of a Deck to make 2-layered)
– Put videos or other screen-filling content in the background layer
– The best Blend Mode for 3D models is Alpha; Which displays them cleanly on top of the background
The following file formats are supported: .glb, .gltf
Using your own Milkdrop (Winamp visualizer) files
You can import Milkdrop files onto a Bank by clicking the little folder icon: The last icon on the Banks icon row (left side of the screen)
– Thumbnails will then be generated for your Milkdrop files; Some patience required
Your milkdrop files are played with whatever settings were baked into them. Changing these settings is something AI VJ cannot do currently
– There are literally 10s of thousands of Milkdrop files freely available
– Most people never change the settings. If you want to you can edit the files yourself, or ask an AI to change them
Milkdrop files are best when added to the BACKground layer of a multilayered deck (dropdown at the top-right of a Deck to make 2-layered)
– Put videos or other screen-filling content in the foreground layer
– The best Blend Mode for videos mixed with milkdrops is Multiply; Which multiplies the pixel color values for a nice watermark effect
The following file formats are supported: .milk
Using multi-layered Decks
You can make a Deck multi-layered by using the dropdown menu at the top-right of the Deck
Currently single layer, and 2-layer decks are supported. If you'd like us to add more, let us know your use-case on Discord
2-Layered decks have a background layer, and a foreground layer
– The foreground layer is at the bottom. Imagine in 3D perspective, looking up at the layers horizon
Visuals on the foreground layer have an extra setting, called Blend Mode. It can be changed in the settings panel (the gears icon)
The extent of the blend / blend effect can be adjusted with the Blend Power setting. From 0 (no blend) to 1 (max blend)
AI VJ supports all the major Blend Modes used in VJ software. Notable ones are:
– Multiply: Multiplies the pixel color values. Making the foreground visual appear like a watermark in the background visual. Especially at a lower Blend Power
– Screen: Multiplies the inverse of both pixel color values. Effectively a brighter variant of Multiply; lightens the output, instead of making it darker
– Darken: Compares the color values of each pixel, keeping the darker one: Nice for darker venues
– Subtract: Subtracts the color values of each foreground pixel from the background, without clipping: Creates a nice photo-negative effect
Recording Videos and Shorts
You can record videos and Shorts using AI VJ
– If audio plays locally, or is fed in through line-in (best) or microphone, it is included in the video
Horizontal, HD (1920 x 1080) videos are recorded using the record icon
– It keeps recording until the record button is pressed again. For shorts this is different
Vertical, HD (1080 x 1920) Shorts are recorded by clicking on the record short icon
– Shorts are 64 beats (8 bars) long. Recording stops automatically. Depending on BPM 64 beats is about half a minute (at the very popular 128 BPM)
Both are saved in your 'My Documents / AI VJ Recordings' folder
Using Spout Output
Spout uses your graphics card to send realtime video between Windows applications on the same machine with near-zero latency or overhead
You can enable Spout under Output in the main menu. Either with the UI (for streaming / demos), or with just the visuals, for post-processing with additional effects
The Spout stream will be called: AI VJ Spout
To use it with Resolume just enable it in AI VJ, and then import it in Resolume. Their tutorial can be found here
To use it for streaming with the excellent and free OBS Studio. Enable it in AI VJ, via 'Main', and 'Output', and then:
– If Dual Monitor / with a projector, make sure in AI VJ under 'Main', 'Display', the 'Enable Visuals Rendering in UI When Dual Screen' option is selected
– Install the OBS Spout plugin
– Then add a Spout2 source as explained in the second half of this video
Keyboard Control
With the keyboard arrows you can scroll in all directions; faster with 'Page Up', 'Page Down', 'Home' and 'End'
When you've selected a visual, bank, deck, or set, you can navigate with the keyboard arrows. Then pressing 'Enter' plays them
You can select & play sets with your PC keyboard using the letters 'q', 'w', 'e', 'r', 't', 'y' (for sets 1 to 6), 'l' (for small logo), 'b' (for big logo) and 'f' (for the flash banner)
You can play decks with your PC keyboard using the numbers '1' - '9', '0' for deck 10
And play banks with your PC keyboard using the F keys. 'F1' - 'F12' for banks 1 - 12
The 'Spacebar' hides the UI, 'Spacebar' or 'Enter' shows it again, 'Escape' or 'Ctrl-q' exits AI VJ
The 'Delete' key removes the selected visuals, banks, decks, or sets
'Ctrl-Z' undoes, 'Ctrl-Y' redoes, and there's an Undo History list in the Edit menu as well
'Ctrl-C' copies the selected visuals, banks, decks, or sets, 'Ctrl-V' pastes, 'Ctrl-T' or 'Ctrl-X' cuts
To duplicate an item, select it, and hit 'Ctrl-D'
To replace it by something you copied, copy one type (say a bank) and hit 'Ctrl-H' while hovering over, or having selected the thing to replace (another bank)
To create a new bank, deck, or set, hover over one, or select one, and hit 'Ctrl-N'
'Ctrl-E' opens the settings window. Select visuals, banks, decks, or sets, to simultaneously edit all of their settings
'Ctrl-S' saves the Mixer, 'Ctrl-O' gets you the open Mixer save file picker
But these only work when the AI VJ window is at the front / active
Other forms of control, including MIDI and controller support will be added in the future
In the meantime, AI VJs automatic behavior should be okay for most uses